

Authentication
Control who can open your Keboola app: a shared password, single sign-on with Google, Microsoft Entra ID, Okta or Auth0, or GitHub, GitLab and JumpCloud accounts.
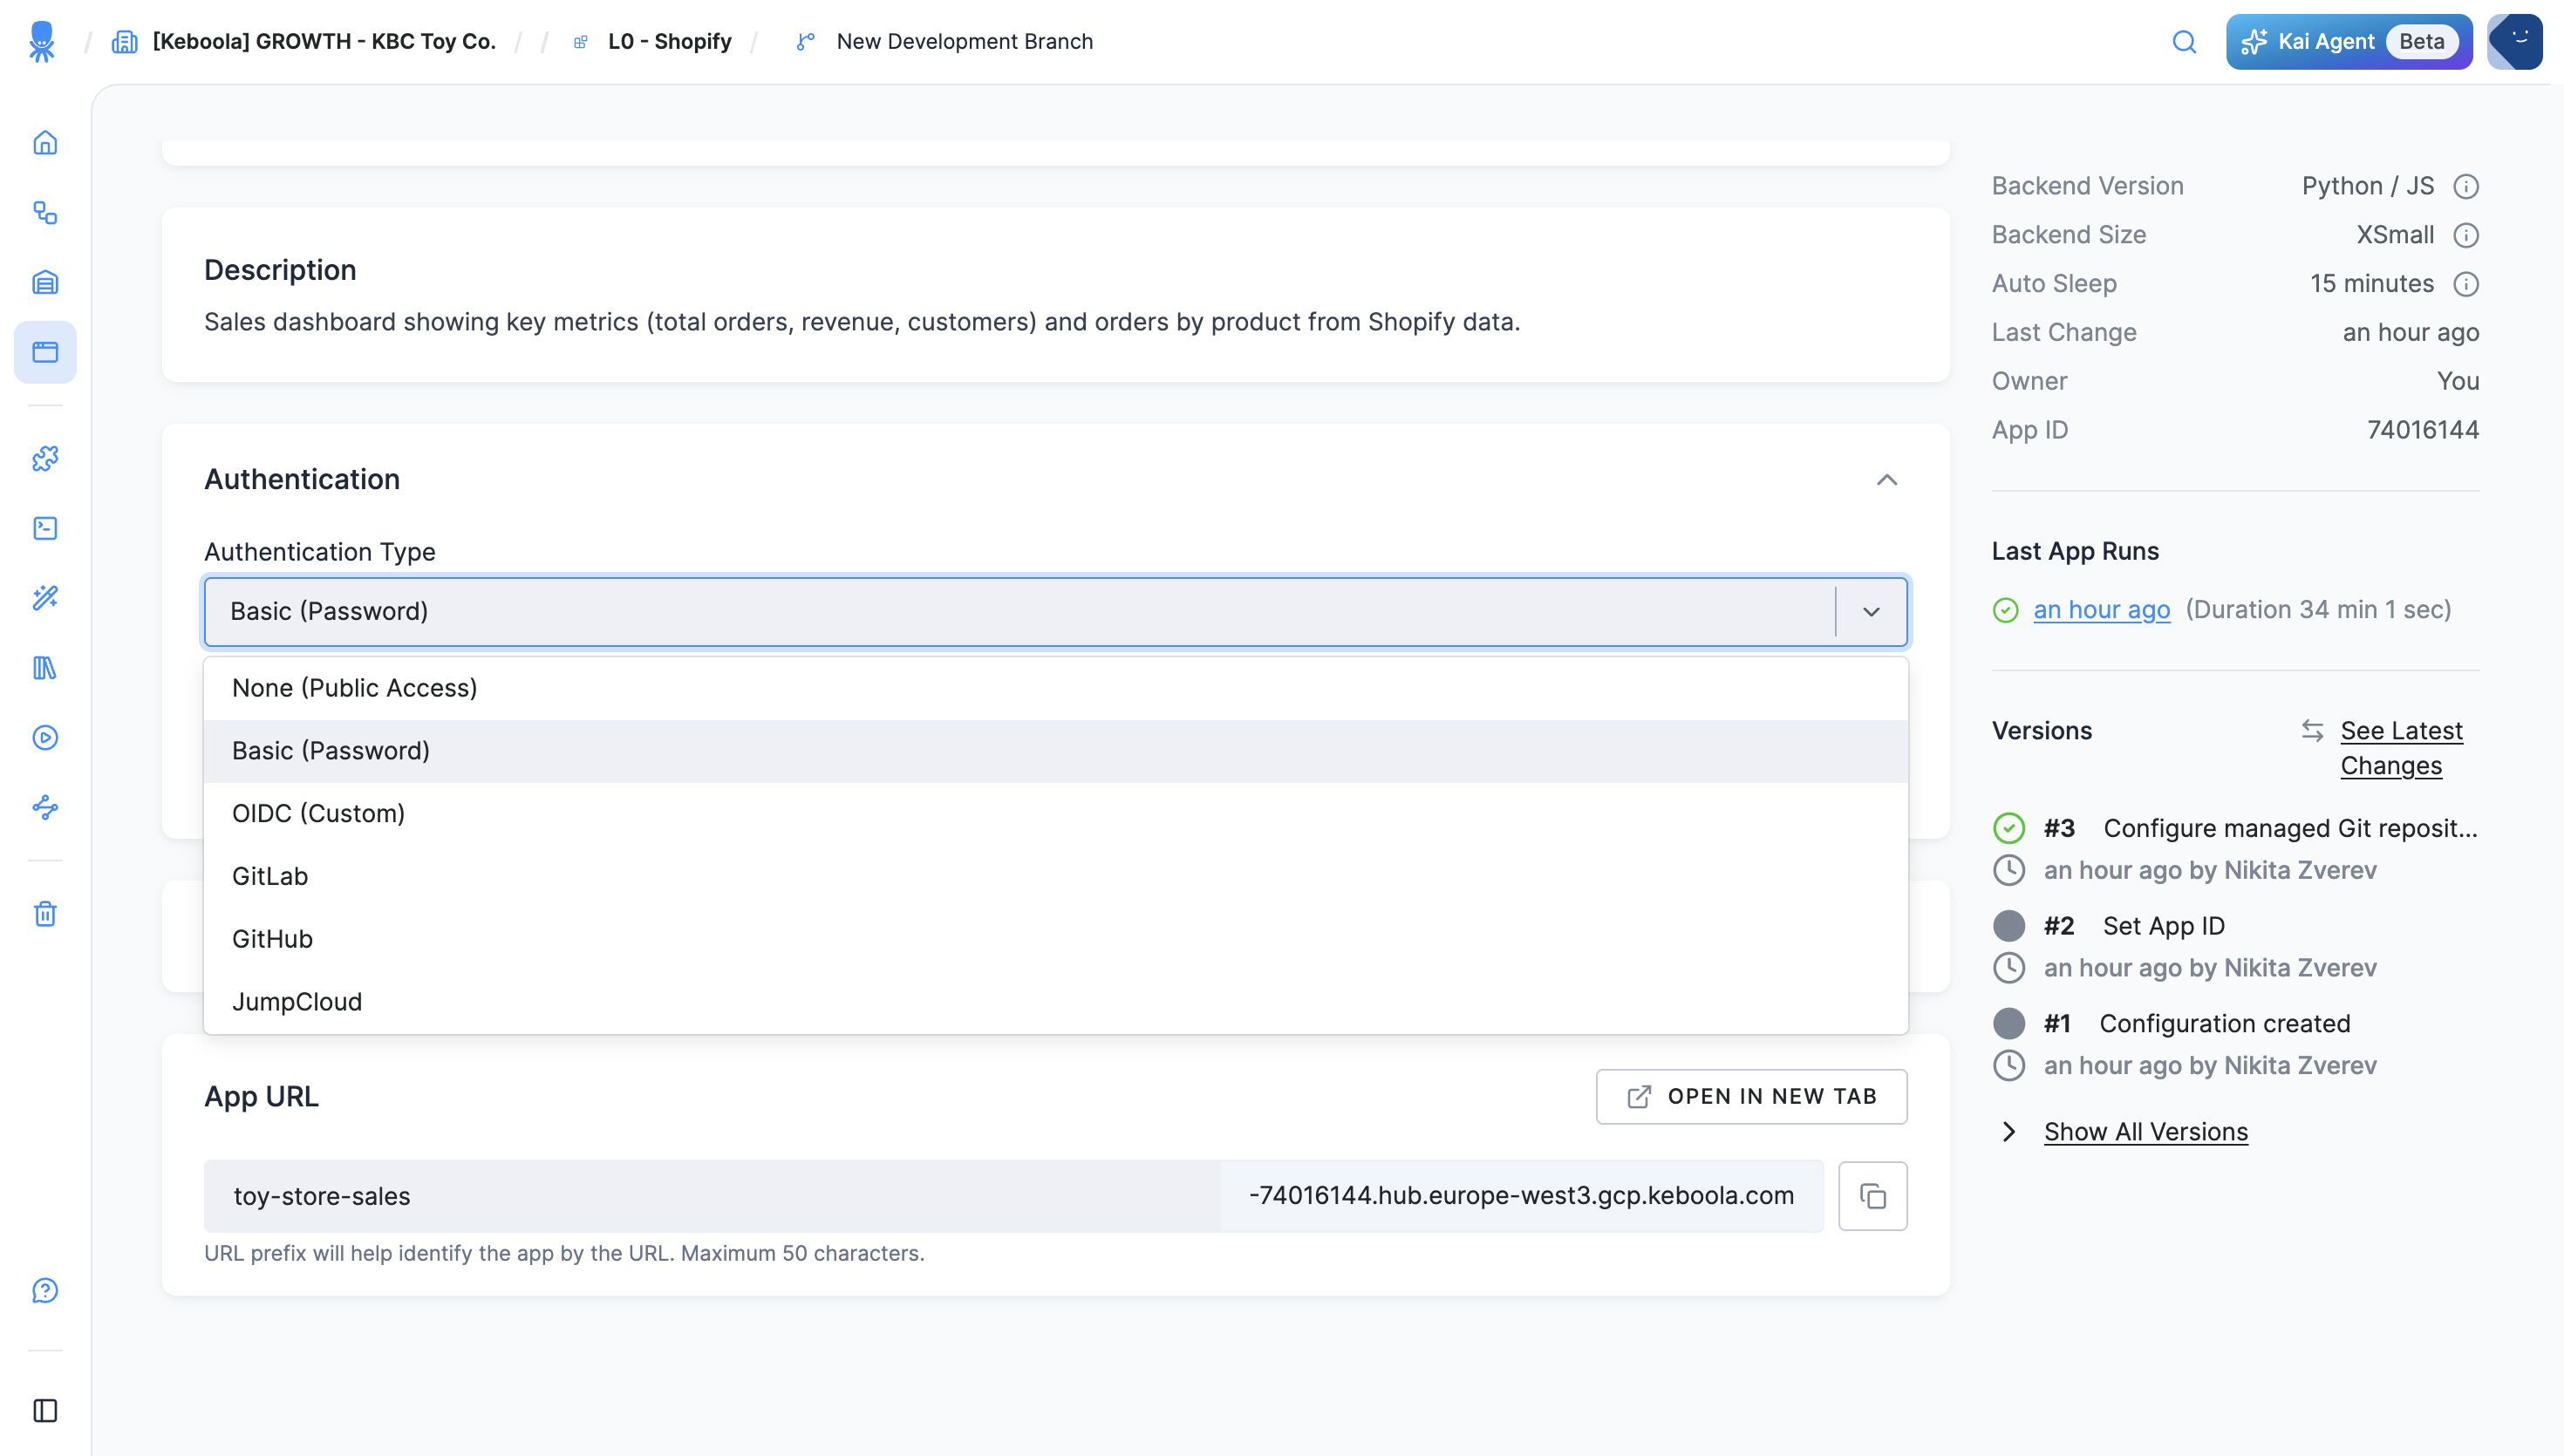
Once an app is deployed, its URL is publicly available. Protect it so only the right people can open it, and choose the method that fits your audience. You set it in the app’s configuration under Authentication → Authentication Type, which offers six options.
Authentication methods
Section titled “Authentication methods”- None (Public Access)the app is public to anyone with the URL. You can still add your own authorization inside the app; for Streamlit, use the Streamlit authenticator (example).
- Basic (Password)the default for new apps. Keboola generates a shared password; users enter it before the app opens. Once the app is deployed, the password is shown on the app’s configuration page next to Open App, ready to copy — and when Kai builds an app, it shows the password as the last step.
- OIDC (Custom)users sign in with your identity provider (Google, Microsoft Entra ID, Okta, Auth0, or any other OIDC provider). Recommended for anything beyond a quick share.
- GitHubrestrict access with GitHub OAuth by organization, team, repository, or allowed users.
- GitLabrestrict access with GitLab OAuth by groups, projects, or roles.
- JumpCloudrestrict access with JumpCloud OIDC, with optional role-based filtering.
OIDC (single sign-on)
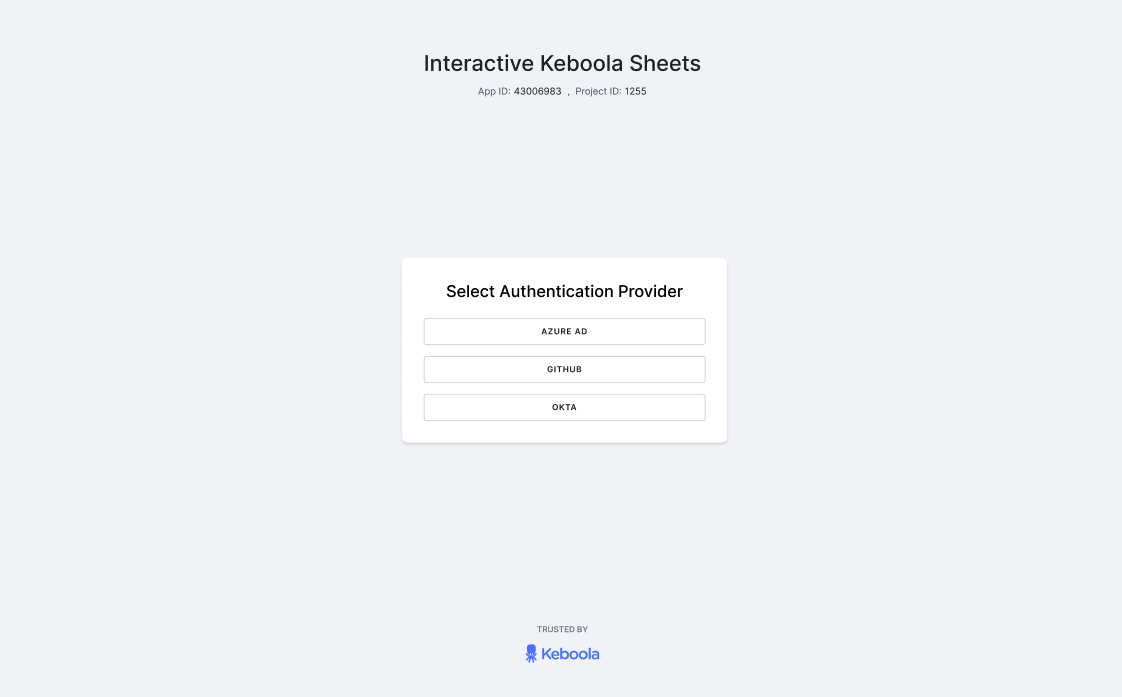
Section titled “OIDC (single sign-on)”OIDC lets users log into your app through your single sign-on (SSO) provider. Keboola has ready-made provider options for Google (Google SSO), Microsoft Entra ID (Azure OIDC), Okta, and Auth0, plus Generic OIDC for any other OpenID Connect provider. Users sign in with the provider you configured; if an app has more than one provider, they first pick an Authentication Provider.
The flow is the same everywhere: create the app in Keboola, register it with your provider using the app’s callback URL, paste the provider’s credentials into the app’s Authentication settings, and deploy.
Step 1 — Create the app and copy its callback URL
Section titled “Step 1 — Create the app and copy its callback URL”Your provider needs the app’s callback URL, so create the app first.
-
In your Keboola project, open Apps, click + Create App, and create the app manually. The app opens on its configuration page. (Adding sign-in to an existing app? Open its configuration instead.)
-
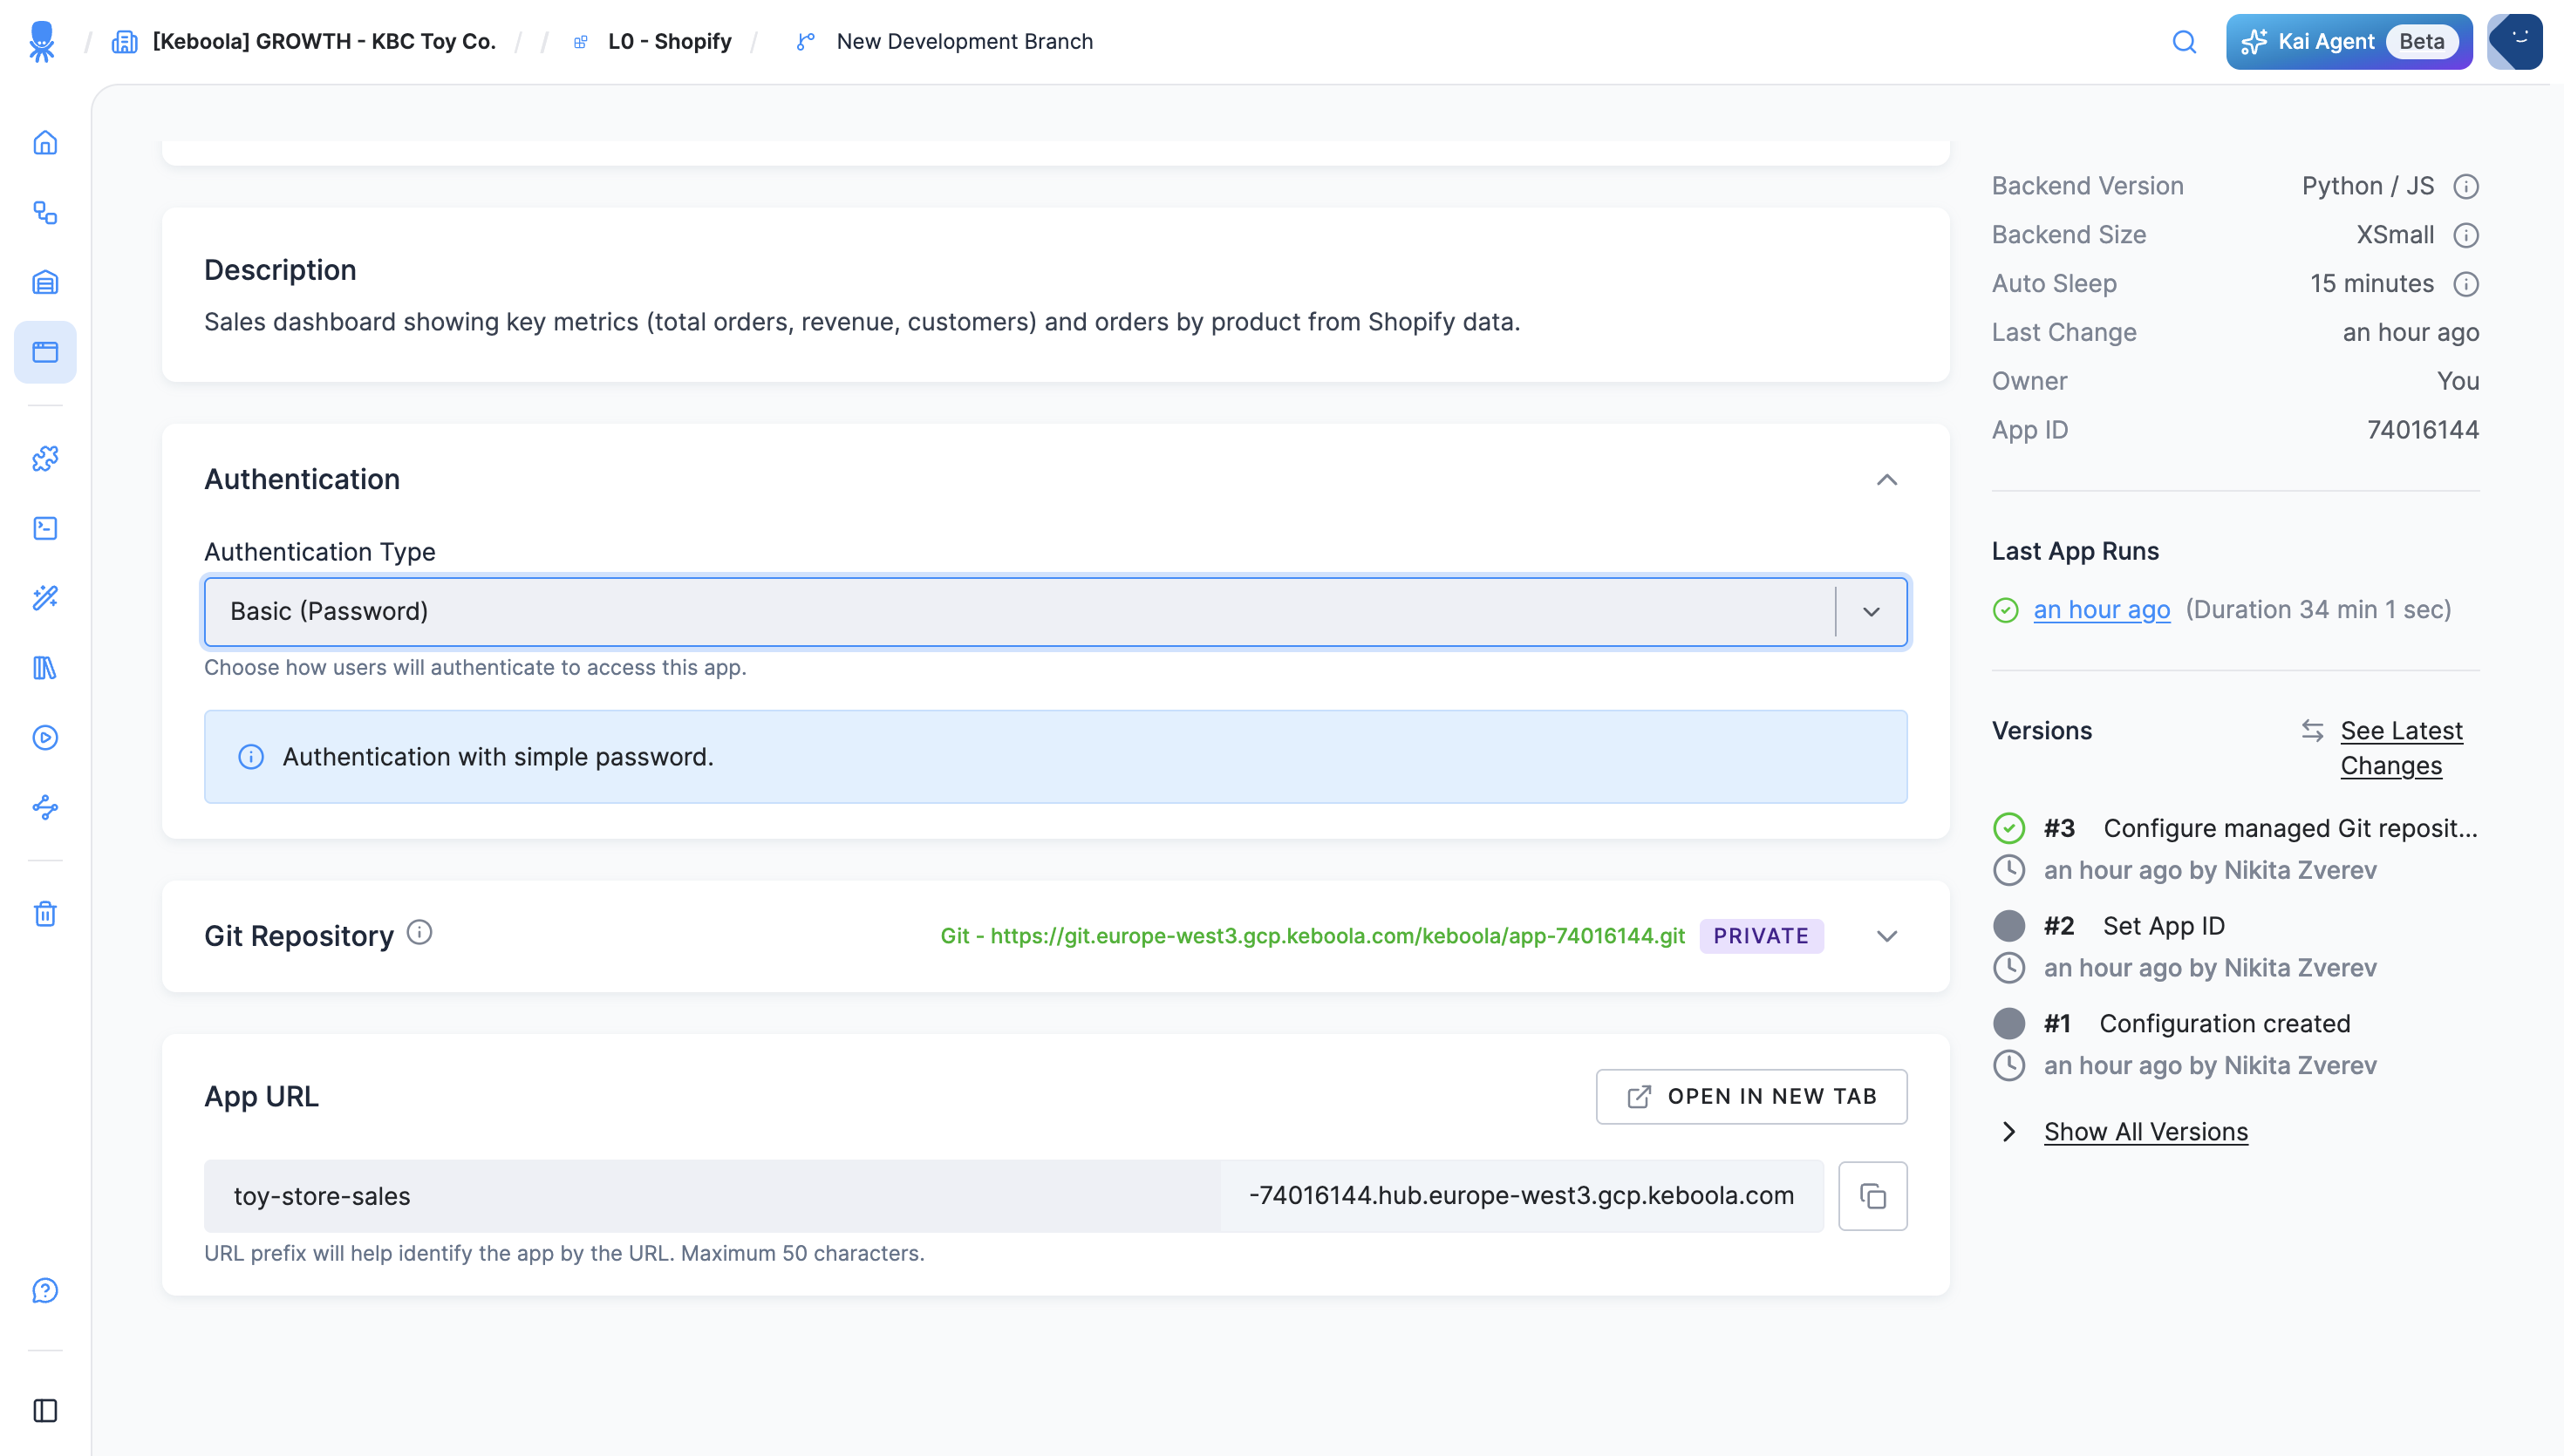
Scroll to the App URL block. It shows the app’s host as a URL prefix plus a generated part, for example
toy-store-salesand-74016144.hub.europe-west3.gcp.keboola.com. Your callback URL ishttps://, that whole host, and/_proxy/callback:https://<url-prefix>-<app-id>.hub.<stack-host>/_proxy/callbackFor example:
https://toy-store-sales-74016144.hub.europe-west3.gcp.keboola.com/_proxy/callbackThe block is there from the moment the app exists; you don’t have to deploy first.
Keep this tab open. Each app has its own callback URL, so register every app with your provider separately.
Step 2 — Set up your identity provider
Section titled “Step 2 — Set up your identity provider”Pick your provider:
Let people sign in with their Google account.
Before you start — you need a Google Cloud project where you can manage the consent screen and OAuth clients: the project Owner role, or the OAuth Config Editor role. Decide who should get in, too. To limit sign-in to your Google Workspace organization, the Google Cloud project must belong to that organization and you pick the Internal audience below. Otherwise the audience is External: any Google account can sign in once you publish the app.
Set up the consent screen:
- Open the Google Cloud console, select your project, and open Google Auth Platform (search for it in the console’s top bar).
- First time in this project? Click Get started and fill in the wizard: App name and User support email, the Audience (Internal for your Google Workspace organization only, External for any Google account), and a contact email, then click Create.
- Open Branding. Under Authorized domains, add
keboola.com, the domain your App URL belongs to, and save. If Google refuses the redirect URI in the next step, it’s because the domain is missing here. - Chose External? Open Audience and add yourself and your testers under Test users (up to 100), or click Publish app to let anyone with a Google account sign in. Until you do one of these, Google turns everyone else away.
Create the OAuth client:
- Open Clients and click Create client.
- Set Application type to Web application and give the client a name, for example
Keboola app - Toy store sales. - Under Authorized redirect URIs, click Add URI and paste the callback URL from step 1. It has to match exactly:
https, the full host, and/_proxy/callbackwith no trailing slash. - Click Create. Copy the Client ID and the Client secret now; Google shows the secret only at creation. If you lose it, open the client and click Add Secret.
Back in Keboola — on the app’s configuration page, under Authentication, set Authentication Type to OIDC (Custom), select Google SSO in the Provider dropdown, and paste the Client ID and Client secret. There’s no issuer field for this option; Keboola uses https://accounts.google.com. Click Save.
If sign-in fails:
Error 400: redirect_uri_mismatch— the URI in the OAuth client differs from the app’s callback URL. Compare them character by character (scheme, host,/_proxy/callback, no trailing slash) and fix the client.- “Access blocked: … has not completed the Google verification process”, or a colleague can’t get past Google — the audience is External and the app is still in Testing, so only listed Test users can sign in. Add them on the Audience page, or click Publish app.
- Someone outside your organization can’t sign in — expected with the Internal audience. Switch to External on the Audience page if that’s not what you want.
invalid_client, or a token error right after signing in — the Client ID or Client secret in Keboola doesn’t match the OAuth client. Paste them again, or add a new secret in Google Cloud and update the app.
Changed the redirect URI or the audience on Google’s side later? No redeploy needed; Google says such changes take from a few minutes to a few hours to apply.
Let people sign in with their Microsoft work account.
Before you start — you need permission to register applications in your tenant; the Application Developer role is enough for the registration itself. Restricting who can sign in needs Cloud Application Administrator or higher.
Register the app:
- Sign in to the Microsoft Entra admin center and go to Entra ID → App registrations → New registration.
- Enter a Name your users will recognize.
- Under Supported account types, keep Single tenant only (the option names your tenant): only users and guests of your tenant can sign in.
- Under Redirect URI (optional), choose Web and paste the callback URL from step 1.
- Click Register. The app’s Overview page opens. Copy the Application (client) ID and the Directory (tenant) ID; Keboola needs both.
Create a client secret:
- Under Manage, open Certificates & secrets and click New client secret.
- Enter a description, pick an expiry, and click Add.
- Copy the secret’s Value right away; Entra hides it once you leave the page. Note the expiry, too: before it passes, create a new secret and update the app’s authentication settings, or sign-in stops working.
Optional — restrict who can sign in. Out of the box, anyone in your tenant can open the app. To let in only specific people or groups, go to Entra ID → Enterprise apps, open your app, and under Manage → Properties set Assignment required? to Yes. Then, under Manage → Users and groups, click Add user/group and pick who may sign in. Assigning groups, rather than single users, needs a Microsoft Entra ID P1 or P2 license. Everyone else now gets AADSTS50105 at sign-in.
Back in Keboola — on the app’s configuration page, under Authentication, set Authentication Type to OIDC (Custom), select Azure OIDC in the Provider dropdown, and paste the Client ID, Client secret, and Tenant ID. Keboola builds the issuer from the tenant ID (https://login.microsoftonline.com/<tenant ID>/v2.0). Click Save.
If sign-in fails:
AADSTS50011: The redirect URI … does not match— the redirect URI in the registration differs from the app’s callback URL. Fix it under Manage → Authentication.AADSTS7000215: Invalid client secret provided— you pasted the secret’s Secret ID instead of its Value, or the secret expired. Create a new one and update the app.AADSTS50105: … is not assigned to a role for the application— you required assignment and this user isn’t assigned. Add them under Enterprise apps → your app → Users and groups.
Let people sign in with their Okta account.
Before you start — you need admin access to your Okta org (the Application Administrator or Super Administrator role) to create app integrations.
Create the app integration:
- In the Okta Admin Console, go to Applications → Applications (in newer orgs the menu is called Applications and Resources) and click Create App Integration.
- Choose OIDC - OpenID Connect as the Sign-in method and Web Application as the Application type, then click Next.
- Enter an App integration name, for example
Keboola app - Toy store sales. - Under Sign-in redirect URIs, replace the default value with the callback URL from step 1. You can remove the default Sign-out redirect URIs entry.
- Under Assignments, decide who can sign in: Allow everyone in your organization to access or Limit access to selected groups (or skip the assignment for now and add people later).
- Click Save. On the General tab, under Client Credentials, copy the Client ID and the Client secret.
Back in Keboola — on the app’s configuration page, under Authentication, set Authentication Type to OIDC (Custom), select Okta in the Provider dropdown, and paste the Client ID and Client secret. Set Domain/Org URL to https://<yourOktaDomain>/oauth2/default; your Okta domain is shown in the Admin Console when you click your name at the top right, for example https://acme.okta.com/oauth2/default. The default authorization server comes with the Integrator Free Plan and with API Access Management; if Security → API → Authorization Servers doesn’t list it, use the org authorization server instead: https://<yourOktaDomain> with no path. Logout URL is optional: https://<yourOktaDomain>/login/signout also ends the Okta session when someone signs out of the app. Click Save.
If sign-in fails:
- “The ‘redirect_uri’ parameter must be a Login redirect URI in the client app settings” — the URI in the integration differs from the app’s callback URL. Fix Sign-in redirect URIs on the integration’s General tab.
- “User is not assigned to the client application” — the user, or their group, isn’t assigned to the integration. Add them on the Assignments tab.
- Issuer or discovery error when the app starts the sign-in — check Domain/Org URL:
https://, your Okta domain,/oauth2/default, no trailing slash. If your org has nodefaultauthorization server, usehttps://<yourOktaDomain>instead.
Let people sign in through Auth0, with whatever connections your tenant offers: username and password, social logins, or enterprise identity providers.
Before you start — you need the Admin role on your Auth0 tenant; the Editor roles can’t create applications.
Register the application:
- In the Auth0 Dashboard, go to Applications → Applications and click Create Application.
- Name it, choose Regular Web Applications, and click Create.
- Open the Settings tab. Under Basic Information, copy the Domain, Client ID, and Client Secret.
- Scroll down to Application URIs and paste the callback URL from step 1 into Allowed Callback URLs.
- Click Save Changes at the bottom of the page.
Back in Keboola — on the app’s configuration page, under Authentication, set Authentication Type to OIDC (Custom), select Auth0 in the Provider dropdown, and paste the Client ID and Client secret. Set Issuer URL to your tenant Domain with https:// in front and a trailing slash, for example https://acme.us.auth0.com/ (or a custom domain such as https://login.acme.com/). The field’s example omits the slash, but Auth0’s issuer ends with one; when in doubt, copy the issuer value from https://<yourAuth0Domain>/.well-known/openid-configuration. Logout URL is optional: https://<yourAuth0Domain>/oidc/logout also ends the Auth0 session when someone signs out of the app. Click Save.
If sign-in fails:
- “Callback URL mismatch” on an Auth0 error page — the URL in Allowed Callback URLs differs from the app’s callback URL. Fix it under Settings → Application URIs.
- Issuer mismatch or discovery error when the app starts the sign-in — the Issuer URL must match the
issuerin Auth0’s discovery document character for character:https://, your Auth0 domain, trailing slash. - Users of one connection can’t sign in — that connection isn’t enabled for this application. Turn it on under the application’s Connections tab.
Any OpenID Connect provider works through the Generic OIDC option.
- In the provider’s console, register an OIDC / OAuth 2.0 web application and set the callback URL from step 1 as its redirect URI.
- Copy the Client ID and Client secret.
- Find the provider’s issuer URL. It’s the
issuervalue in the provider’s discovery document, usually athttps://<provider-host>/.well-known/openid-configuration. Copy it exactly, trailing slash included or omitted as the document has it — Keboola verifies it character for character. - Back in Keboola, set Authentication Type to OIDC (Custom), select Generic OIDC in the Provider dropdown, and paste the Client ID, Client secret, and Issuer URL. Logout URL is optional; it ends the provider’s session when someone signs out of the app. Click Save.
The Okta and Auth0 tabs walk through the same flow with a real console, so they make a useful template.
Step 3 — Deploy and test
Section titled “Step 3 — Deploy and test”- Set the app’s code source and click Deploy App; the short wizard asks for the backend size and an inactivity timeout. (Details: Create an app manually. Just testing sign-in? A Streamlit app with a one-line inline script is the quickest thing to deploy.)
- When the status turns Active, click Open App. Your provider asks you to sign in, then sends you into the app.
Changing the authentication settings of an app that’s already deployed? Click Redeploy App so the change takes effect.
Provider settings at a glance
Section titled “Provider settings at a glance”| Provider | Keboola provider option | What you enter besides Client ID and Client secret |
|---|---|---|
| Google Cloud | Google SSO | Nothing; the issuer https://accounts.google.com is preset |
| Microsoft Entra ID | Azure OIDC | Tenant ID; Keboola derives the issuer https://login.microsoftonline.com/<tenant ID>/v2.0 |
| Okta | Okta | Domain/Org URL: https://<yourOktaDomain>/oauth2/default |
| Auth0 | Auth0 | Issuer URL: https://<yourAuth0Domain>/ |
| Any other | Generic OIDC | Issuer URL from the provider; Logout URL optional |
<yourOktaDomain> and <yourAuth0Domain> are your tenant hosts, for example acme.okta.com or acme.us.auth0.com.
GitHub authentication
Section titled “GitHub authentication”Restrict access to your app using GitHub OAuth. Users authenticate via their GitHub account, and you can optionally restrict access to specific organizations, teams, repositories, or individual users.
Required fields
Section titled “Required fields”| Field | Description | Example |
|---|---|---|
| Client ID | Client ID from GitHub Developer Settings > OAuth Apps. | Ov23liABCDEF123456 |
| Client Secret | Client Secret from the same GitHub OAuth App. | (paste your GitHub secret) |
Optional fields
Section titled “Optional fields”| Field | Description | Example |
|---|---|---|
| GitHub URL | Your GitHub Enterprise Server URL. Leave empty for public GitHub. | https://github.com |
| Organization | URL slug of your GitHub organization. Restricts access to organization members. | my-company |
| Team | URL slug of the team within the organization. Requires Organization to be set. | data-engineers |
| Repository | Restrict to repository collaborators. Format: owner/repo-name. | my-company/analytics |
| Access Token | Required for private org/team/repo restrictions. Needs read:org scope. Generate at GitHub > Settings > Developer Settings > Personal Access Tokens. | ghp_... |
| Allowed Users | Comma-separated GitHub usernames. If set, only these users can log in. | jane-smith, john-doe |
Setup instructions
Section titled “Setup instructions”- Go to your GitHub account Settings > Developer Settings > OAuth Apps and create a new OAuth App.
- Set the Authorization callback URL to:
https://<dataAppId>.hub.<keboolaConnectionHost>/_proxy/callback(e.g.,https://my-app-12345678.hub.north-europe.azure.keboola.com/_proxy/callback). - Copy the Client ID and Client Secret from the created OAuth App.
- In your Keboola app configuration, select GitHub as the authentication method.
- Paste the Client ID and Client Secret.
- Optionally configure organization, team, repository, or allowed users restrictions.
- If you use organization, team, or repository restrictions with a private organization, provide an Access Token with
read:orgscope. - Save and redeploy your app.
GitLab authentication
Section titled “GitLab authentication”Restrict access to your app using GitLab OAuth. Users authenticate via their GitLab account, and you can optionally restrict access by groups, projects, or roles.
Required fields
Section titled “Required fields”| Field | Description | Example |
|---|---|---|
| Client ID | Application ID from GitLab > Settings > Applications. | a1b2c3d4e5f6... |
| Client Secret | Application secret from the same GitLab application. | gloas-xxxxxxxxxxxxxxxxxxxxxxxxxxxx |
| GitLab Instance URL | Use https://gitlab.com for public GitLab, or your self-hosted URL. | https://gitlab.com |
Optional fields
Section titled “Optional fields”| Field | Description | Example |
|---|---|---|
| Groups | Only members of these groups can access the app. Use the URL path, not the display name. Separate multiple groups with commas. | my-org/data-team |
| Projects | Restrict access to members of these projects. Format: namespace/project-slug. | my-org/analytics-app |
| Allowed Roles | Leave empty to allow any role. Valid values: guest, reporter, developer, maintainer, owner. | developer, maintainer |
Setup instructions
Section titled “Setup instructions”- Go to your GitLab instance Settings > Applications and create a new application.
- Set the Redirect URI to:
https://<dataAppId>.hub.<keboolaConnectionHost>/_proxy/callback(e.g.,https://my-app-12345678.hub.north-europe.azure.keboola.com/_proxy/callback). - Ensure the
openid,profile, andemailscopes are selected. If you use group or project restrictions, also selectread_api. - Copy the Application ID and Secret.
- In your Keboola app configuration, select GitLab as the authentication method.
- Paste the Client ID, Client Secret, and GitLab Instance URL.
- Optionally configure groups, projects, or allowed roles restrictions.
- Save and redeploy your app.
JumpCloud authentication
Section titled “JumpCloud authentication”Restrict access to your app using JumpCloud OIDC. Users authenticate via their JumpCloud account, and you can optionally restrict access by roles.
Required fields
Section titled “Required fields”| Field | Description | Example |
|---|---|---|
| Client ID | Client ID from JumpCloud Admin Console > SSO > your app. | 6507c80f5f2b490a... |
| Client Secret | Client Secret from JumpCloud Admin Console > SSO > your app > SSO tab. Treat like a password. | (paste your JumpCloud secret) |
| Issuer URL | Pre-filled. For custom tenants, ask your JumpCloud admin for the correct issuer URL. | https://oauth.id.jumpcloud.com/ |
| Logout URL | Pre-filled. Change only if your JumpCloud admin provides a different logout endpoint. | https://oauth.id.jumpcloud.com/oauth2/sessions/logout |
Optional fields
Section titled “Optional fields”| Field | Description | Example |
|---|---|---|
| Allowed Roles | Role values must match exactly what is set in JumpCloud’s attribute mapping. Leave empty to allow any authenticated user. | data-analyst, admin |
Setup instructions
Section titled “Setup instructions”- In the JumpCloud Admin Console, go to SSO and create a new application (or use an existing one).
- Configure the application as an OIDC application.
- Set the Redirect URI to:
https://<dataAppId>.hub.<keboolaConnectionHost>/_proxy/callback(e.g.,https://my-app-12345678.hub.north-europe.azure.keboola.com/_proxy/callback). - Copy the Client ID and Client Secret from the SSO tab.
- In your Keboola app configuration, select JumpCloud as the authentication method.
- Paste the Client ID, Client Secret, Issuer URL, and Logout URL.
- Optionally configure allowed roles to restrict access.
- Save and redeploy your app.
Callback URL format
Section titled “Callback URL format”All authentication methods that use OAuth or OIDC require a callback URL. The format is always:
https://<dataAppId>.hub.<keboolaConnectionHost>/_proxy/callbackFor example: https://my-app-12345678.hub.north-europe.azure.keboola.com/_proxy/callback
<dataAppId> stands for the whole host shown in the App URL block on the app’s configuration page: the URL prefix, a hyphen, and the App ID (for example toy-store-sales-74016144). Take that host, add https:// in front and /_proxy/callback at the end.
Next: Publish and share →